Getting Started
This guide will walk you through the Umbrella onboarding. Within 5 minutes, you should be able to connect your store and launch your first protection plan(s).
Sign up
- Go to https://app.myumbrella.ai/sign-up and create an account.
- Create an Organization. Each organization can be associated with one e-commerce store. The number of organizations (stores) you can create depends on the plan you've subscribed to (Basic: 1; Pro: 5, Enterprise: Unlimited). You may assign a logo image for each organization.
Install the Umbrella app
- From the Quick Start Wizard or the Integrations page, click "Connect Shopify".
- Accept the app request to connect to your store.
- Umbrella will begin importing products and syncing store data.
Create Your First Plan
Navigate to the Warranties section and click "Create Plan". You’ll walk through:
Name your plan (e.g., “Extended Protection", "Accident Coverage”, "Electronics Protection Plan"). This name will appear on the customer facing widget, so use something catchy and engaging

Choose which products will be eligible for this plan using conditions like collection, brand, or tag. Similarly, you can also exclude products using the same conditions. This enables you to target specific products with specific plans. For example you may want one OEM plan, another extended coverage plan for electronics, another for a specific brand, and so on.

OEM vs Extended
Choose a plan type. Umbrella can power several types of protection plans.

Extended warranties are offered as an optional upsell on eligible products. You'll need to configure similar coverage terms to the OEM plans, but will also need to set up pricing since customers must pay for an extended warranty. Think of Apple Care, but for your own store and brand.
OEM warranties on the other hand are automatically tracked for eligible products sold in your store. They are not sold, but rather applied automatically for free, and meant to provide your customers with a way to view their warranty eligibiity and file claims for products they've purchased in your store.

Choose which types of events you will provide coverage for. For example you may wish to cover mechanical failures but not liquid damage. The options you select here will be available on the claim form for the customer to submit as a reason for their claim.

If you're creating an extended coverage plan, you'll need to establish pricing for each length of coverage you want to offer. You will need to choose:
- Variant Title - You can choose to offer multi-option coverage, so each option needs a name (ex. 1 year, 2 year; or limited coverage, full coverage)
- Term length and unit of measure -This is the time window when the customer will be able to file a claim. For a lifetime warranty, choose "lifetime" from the dropdown menu.
- Price type
- Flat rate - the price of coverage will be statically assigned to a set price regardless of product.
- Variable rate - the price of coverage will be dynamically calculated based on a percentage of the product price.

- Your plan terms and conditions are automatically generated using company info and plan info. Click "Customize & Generate" to edit your company details to ensure all values are completed, and then click "Populate Terms".


The status provides a simple way to disable a plan with 1 click, in case you want to stop offering it in your store. Customers will still be able to file claims for disabled plans, but they'll no longer be available for sale on your site until they're re-enabled.

Choose your plan logo image, or upload a custom image. This will appear in your product widget (you can disable it from the Branding Settings page), and on your customer order history portal.

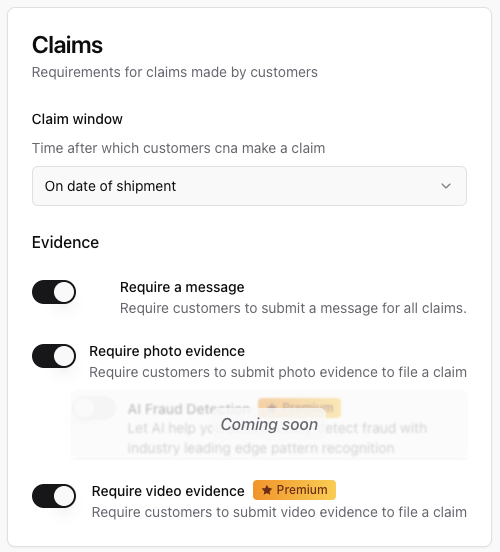
Choose requirements for claim evidence, and the time after which customers can file a claim. For example you may want to wait a certain amount of time after delivery, to account for your return policy or an OEM warranty.
Resolutions can be automated or issued manually. You have the option to auto-approve claims which meet all of the criteria, and optionally issue automated credits as well. You can delay approvals to prevent abuse of your warranty program.

Click "Create plan". At this time the warranty product will be generated, and immediately created in your online store!
Add the Umbrella widgets to your store
Shopify
Merchants on Shopify 2.0 themes can easily add the Umbrella App Embeds and Extensions to your online store.
Merchants on Shopify 1.0 themes, or those with legacy customer accounts ebabled, will need to follow the instructions on screen to copy/paste the code snippets into your theme files. If you need assistance, our team can take care of this for you if you reach out.
1. Global JS Script
The Global JS script ensures Umbrella is populating on the appropriate pages and tracks performance for plan and conversion analytics. This will open Shopify's online store theme editor in a new tab, where the JS will instantly be added. If successful, you'll see the below toast message at the bottom of your screen. You should also now see the Umbrella App embed and ensure it is enabled. You can close this tab.
.gif)
2. PDP (Product Page Widget)
The PDP widget allows customers to add a plan product to their cart with no disruption to the shopping experience.
To view the plan widget in the theme builder, be sure to preview a product that is eligible for coverage.
.gif)
3. Claim portal
The claim portal displays your customers policy details, and a form where they can submit evidence and file claims.
.gif)
4. Order Status Extension
The order status extension lets customers view their warranty eligibilty and file claims from their Order Status page in your Shopify store.
.gif)
Shopify Plus
Checkout Extension
Install the "Checkout Extension". Merchants on a Shopify Plus plan can take avantage of upsells in the checkout page. Customers can view coverage and purchase coverage for uncovered products in their cart until the last moment.
That's it! Umbrella is now live on your store. Customers can purchase coverage on eligible products, and file claims directly from their order status page.
WooCommerce
Coming Soon! Check back in a few months for our WooCommerce app release! Reach out directly with any questions or for an updated ETA.
Magento
Coming Soon! Check back in a few months for our Magento app release! Reach out directly with any questions or for an updated ETA.
BigCommerce
Coming Soon! Check back in a few months for our BigCommerce app release! Reach out directly with any questions or for an updated ETA.
Test the Workflow
Before going live, we recommend testing:
- A checkout flow with a protection plan upsell
- A sample order as a customer.
- A test claim submission as a customer.
- A claim approval as an admin.
If you’re using Shopify, you can simulate purchases using Shopify’s “Bogus Gateway” or place a real order with a low-cost test product.
Go Live
Once your plans are active, they'll appear on your website on page, cart and other pages. Customers can start purchasing coverage immediately, and claims can be managed from the Claims tab. You’re now ready to protect your product!
Next Steps
- Get familiarized with the dashboard
- Reviewing claims
- Product metrics and performance

